Step 2 — Import Transport Requests (OTs) in SAP
Step 2 — Import Transport Requests (OTs) in SAP
This guide consolidates and streamlines the steps to upload and import the Crestone SAP transport requests (OTs) into your SAP landscape.
These transport orders contain the packages needed for Crestone to execute custom RFCs within SAP.
Prerequisites
- SAP permissions to:
- Access the SAP file system or run function modules in
SE37(and optionally transactionCG3Zon ERP systems). - Use the Transport Management System (
STMS) to import transport requests.
- Access the SAP file system or run function modules in
- The target client number where the objects must be imported.
1) Download the transport files
- Download the transport pair that matches your SAP release:
- SAP S/4HANA:
K901242.S4H(cofile) andR901242.S4H(data file). - SAP ECC:
K900101.ABA(cofile) andR900101.ABA(data file).
- SAP S/4HANA:
- Store the files locally without renaming them; SAP expects the
K*andR*naming pattern.
2) Make the transport files available on the SAP server
Use one of these options to move the downloaded K* and R* files onto the SAP server. Choose A if you have OS-level access to the SAP server. Otherwise use B.
A. Copy directly to the transport directories (if you have file-system access)
- Copy the cofile (
K9******) into the cofiles directory under your SAP transport directory. - Copy the data file (
R9******) into the data directory under your SAP transport directory. - Confirm both files are present on the server.
Tip: Your BASIS team can provide the exact DIR_TRANS path (the root of the transport directories).
B. Upload via function module (no file-system access)
- Go to transaction
SE37and execute the function moduleARCHIVFILE_CLIENT_TO_SERVER. - Upload the data file:
- Field PATH: select your
R9******transport data file. - Field TARGET PATH:
<DIR_TRANS>\data\R9******(use your transport root path). - Enable case sensitivity and Execute; confirm the upload if prompted.
- Field PATH: select your
- Upload the cofile:
- Field PATH: select your
K9******transport cofile. - Field TARGET PATH:
<DIR_TRANS>\cofiles\K9******. - Enable case sensitivity and Execute; confirm the upload.
- Field PATH: select your
- (Optional, ERP only) You may alternatively use transaction
CG3Zto upload both files to the same destinations.
At this point, both transport files are available to SAP for import.
3) Add the transport to the import queue and import it
- Open transaction
STMS(Transport Management System). - Click Import Overview.
- Double-click the target system’s import queue (where you will import the transport).
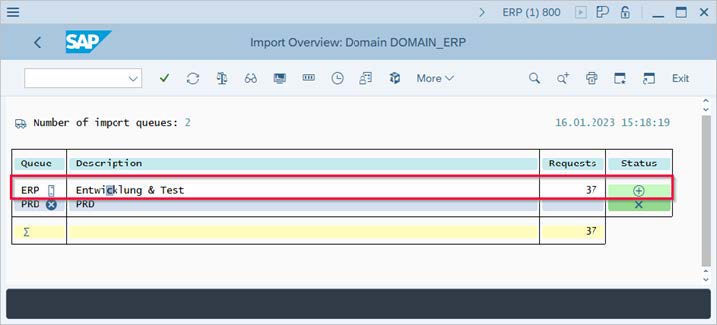
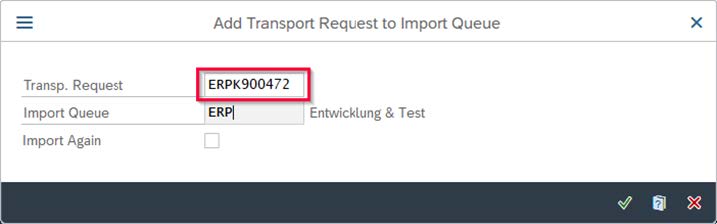
- Choose More ▸ Extras ▸ Other Requests ▸ Add, then select your transport request and confirm.
- Back in the queue, select your request and click Import Request.
- In Import Transport Request:
- Enter the target client.
- If the source system release differs from the target system, select Ignore Invalid Component Version.
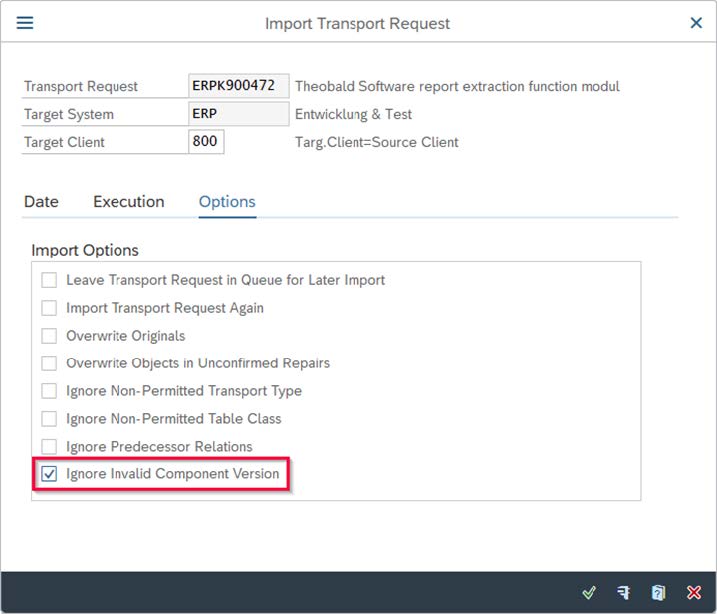
- Confirm to start the import.
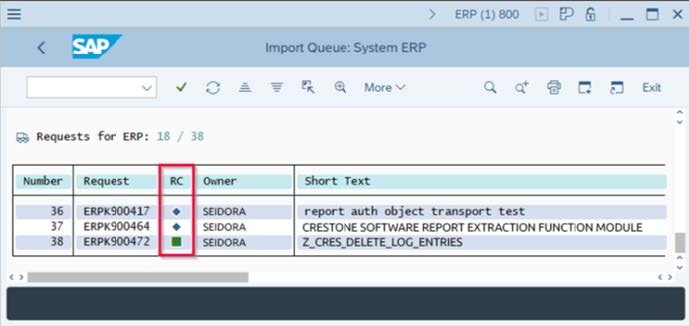
4) Verify the result
- In the
STMSimport overview, check the RC (return code) column for your request:- Green = Import successful.
- Warning = Depends on the SAP system configuration you can receive a warning message. This is OK for the purpose of CRESTONE installation.
- Error = Double-click the status icon to open the logs and resolve any issues reported.
Notes & Tips
- If the transport does not appear after adding it, refresh the queue or re-add the request.
- Ensure the transport sequence is correct if there are multiple dependent requests.
- Always import into a non-productive system first, validate, and then move to QA/PRD according to your change management process.
Summary
- Download the transport delivery and pull out the
K*andR*files. - Place
K*andR*files into the SAP transport directories (via OS copy orARCHIVFILE_CLIENT_TO_SERVER/CG3Z). - Add the request to the import queue in
STMSand Import into the target client. - Verify the RC status and check logs if needed.