Microsoft Fabric
Microsoft Fabric
Required Data
To connect to Microsoft Fabric via API you need 4 required pieces of information:
| Item | Description | Location |
|---|---|---|
| Tenant ID | Unique identifier of the Azure AD tenant. | Microsoft Entra ID → Overview |
| Client ID | Unique identifier of the application registered in Azure AD. | App Registrations → Your application |
| Client Secret | Secret generated for the application registration in Azure AD. | App Registrations → Certificates & Secrets |
| Workspace ID | Unique identifier of the Microsoft Fabric workspace. | Workspace URL in Fabric |
| lakehouse_id | Identifies the specific Lakehouse | Lakehouse URL in Fabric |
How to Get the Tenant ID
- Sign in to the Microsoft Entra ID portal.
- In the left menu, search for and select Microsoft Entra ID
- On the Overview panel you will see your Tenant ID
Example:
Tenant ID: c25f1c67-xxxx-xxxx-xxxx-xxxxxxxxxxxx
Copy and save this value.
How to Create an App Registration
(Client ID + Client Secret)
Create the Application
- In the Azure portal, under Microsoft Entra ID, select App registrations in the left menu.
- Click New registration.
- Fill in the fields:
- Name: Enter a descriptive name for the application.
- Supported account types: Select "Accounts in this organizational directory only".
- Redirect URI: Leave blank.
- Click Register.
Get the Client ID
Once the application is created:
- You will see the Overview page for your application
- Copy the value of Application (client) ID
Example:
Application (client) ID: 59c4c6e3-xxxx-xxxx-xxxx-xxxxxxxxxxxx
Copy and save this value.
Create the Client Secret
- In your application's left menu, go to Certificates & secrets
- Click + New client secret
- Configure:
- Description: crestone-onelake-secret (or any description)
- Expires: Select 1 year (or the desired period)
- Click Add
- IMPORTANT: Copy the Value of the secret immediately
Example:
Value: abc123DEF456~xxxxxxxxxxxxxxxxxxxxxxxxx
This value is shown ONLY ONCE. If you don't copy it now, you'll need to create a new secret. Copy and store this value securely.
Configure Application Permissions
Without these permissions, the application will receive 403 (Access Denied) errors.
- In your application, go to API permissions (in the left menu)
- Click + Add a permission
- Search for and select Azure Storage
- Select Delegated permissions
- Check the permission: user_impersonation
- Click Add permissions
- IMPORTANT: Click Grant admin consent for [Your organization]
- Confirm by clicking Yes
Verification: Permissions should appear with a green check (✓) in the Status column.
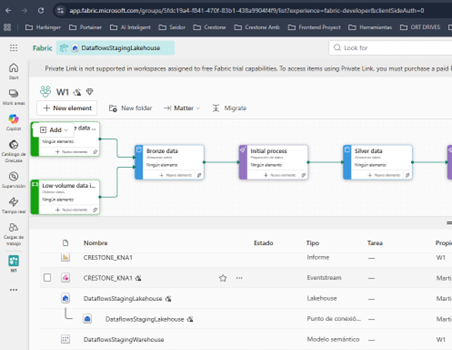
How to Get the Workspace ID
- Go to Microsoft Fabric: fabric.microsoft
- Navigate to your workspace (e.g., "W1")
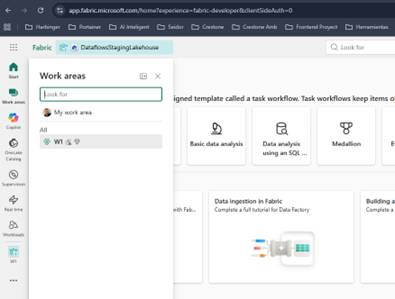
- Check the browser URL
The URL will have this format:
https://app.fabric.microsoft.com/groups/31cd18a4-xxxx-xxxx-xxxx-xxxxxxxxxxxx/...
![]()
The Workspace ID is after /groups/:
Workspace ID: 31cd18a4-xxxx-xxxx-xxxx-xxxxxxxxxxxx
Copy and save this value.
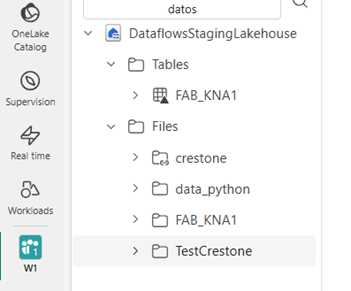
How to Get the Lakehouse ID
- Inside your workspace in Fabric, click your Lakehouse
- Check the browser URL
https://app.fabric.microsoft.com/groups/[workspace-id]/lakehouses/a1b2c3d4-xxxx-xxxx-xxxx-xxxxxxxxxxxx
![]()
The Lakehouse ID is after /lakehouses/:
Lakehouse ID: a1b2c3d4-xxxx-xxxx-xxxx-xxxxxxxxxxxx
Do not confuse the Lakehouse with the Endpoint.
Difference between Lakehouse and Endpoint When you create a Lakehouse in Microsoft Fabric, TWO resources are automatically created:

LAKEHOUSE (house-with-waves icon)
-
Visual name: DataflowsStagingLakehouse (Lakehouse)
-
Function: Physical storage in OneLake
-
Contains:
- Files/ folder
- Tables/ folder
- Delta Lake (parquet files)
- _delta_log
-
URL like
.../lakehouses/[lakehouse-id] -
Used for: OneLake REST API, file read/write
-
THIS IS THE ONE YOU NEED FOR THE API
ENDPOINT (house-with-6-windows icon)
- Visual name: DataflowsStagingLakehouse (Endpoint)
- Function: SQL view of the Lakehouse
- Allows: SELECT queries on Delta tables
- URL type: .../mirroredwarehouses/[warehouse-id]
- Used for: Power BI, SQL Endpoints, Notebooks
- NOT USED FOR THE ONELAKE API
Verification: The URL must contain /lakehouses/ (NOT /mirroredwarehouses/ or /sqlendpoints/).
Copy and save this value.
Configuration Summary
At the end you should have these 5 values:
| Item | Example |
|---|---|
| Tenant ID | c25f1c67-xxxx-xxxx-xxxx-xxxxxxxxxxxx |
| Client ID | 59c4c6e3-xxxx-xxxx-xxxx-xxxxxxxxxxxx |
| Client Secret | abc123DEF456~xxxxxxxxxxxxxxxxxxxxxxxxx |
| Workspace ID | 31cd18a4-xxxx-xxxx-xxxx-xxxxxxxxxxxx |
| Lakehouse ID | a1b2c3d4-xxxx-xxxx-xxxx-xxxxxxxxxxxx |
Security Never share these values publicly. Store them securely (such as a password manager or environment variables).
Workspace Permissions Required
Important: This configuration must be performed by someone with Admin or Member permissions in the workspace.
Why is this necessary? Microsoft Fabric has TWO independent security layers:
- Workspace permissions (who can view and manage resources)
- OneLake permissions (who can read/write data in the Lakehouse)
Both must be configured separately.
Add the App as a Workspace Member
- Enter your Workspace (e.g., W1)
- In the top-right corner, click Manage access
- Click + Add people or groups

- In the search box, type the name of your Azure app: crestone-onelake
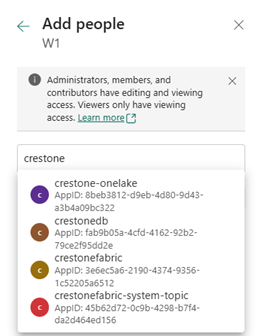
- or you can search by the client_id if it doesn't appear by name
-
Select the appropriate role:
- Contributor (recommended for read/write)
- Admin (if it needs to manage the entire workspace)
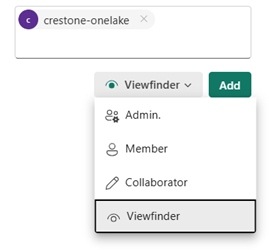
-
Click Add Verification: The application crestone-onelake should appear in the workspace members list with the assigned role.

Configure Lakehouse Permissions (OneLake Security)
(OneLake Security)
Without these permissions, the API will return 403 errors even if the app has workspace access.
What are OneLake Permissions?
They are specific permissions to read/write files in the physical storage of the Lakehouse. They are independent from workspace permissions.
Access OneLake Security Settings
- Inside your workspace, click the Lakehouse
- Name: DataflowsStagingLakehouse (Lakehouse)
- Do not confuse with the "Endpoint"
- In the top-right corner click Manage OneLake security (preview)
Create or Modify the Permission Role
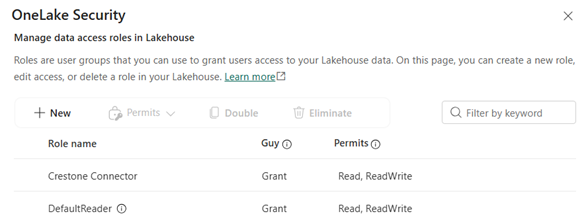
The OneLake Roles screen will open:
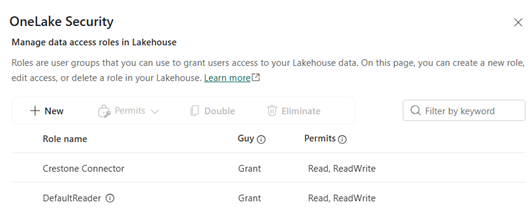
OneLake Roles
- DefaultReader
- (you can create new roles here)
Option A: Create a New Role
- Click + New role
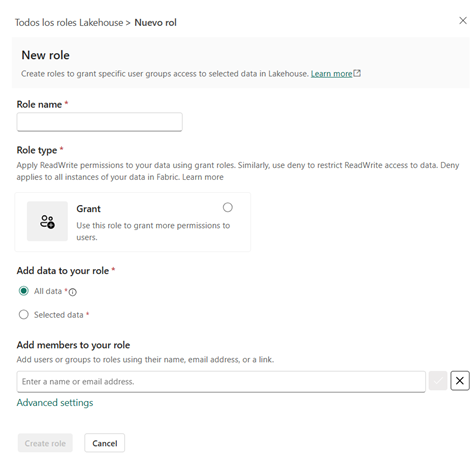
- Configure:
- Role name: crestoneConnector (or a name you prefer)
- Role type: Select Grant
- Data scope:
- Select All data
- Or specify specific folders if you want to limit access
Option B: Use an Existing Role If an appropriate role already exists, you can modify it directly.
Add Members to the Role
- Inside the role (crestoneConnector or the one you created)
- Click + Add members
- Search for and add:
- crestone-onelake (your App Registration)
- Access type: ReadWrite
- Optionally add your personal user:
- Crestone (your account)
- Access type: Admin
Recommended Final Configuration
| Member | Role | Permissions | Scope |
|---|---|---|---|
| crestone-onelake | crestoneConnector | ReadWrite | All data |
Verification
- Click Save or Apply
- Verify the role appears with the correct permissions
- Changes may take 1-2 minutes to apply
Permissions Configuration Summary
At the end you should have:
- App Registration has API permissions in Azure (Azure Storage - user_impersonation)
- App Registration is Contributor in the Workspace
- App Registration has ReadWrite permissions in OneLake Security
- Your user has Admin permissions in OneLake Security (optional but recommended)
If any of these steps are missing, the API will fail with 403 (Forbidden) errors.